Publishing WordPress to Facebook?

To organize publishing to Facebook from your WordPress blog is a more complicated task than publishing to Twitter. However, the Wordbook plugin lets you publish posts on your Facebook Wall without problems.

Download and activate this plugin, it requires php 5.0 or higher. For activation I had to enter my Facebook account from my WordPress admin panel. Enter the settings of the plugin “Wordbook” in the “Settings” Wordbook in the left sidebar in the admin panel of your WordPress site. The page suggested me to set the connection to Facebook, so I followed the instructions of the plugin and clicked the Facebook link. The login dialogue appeared. I typed in the data.

Generated the code.

I returned to the settings page of the plugin and pasted the code.

I clicked again on the Facebook link at the same page, and I was taken to the Facebook account again. There I had to allow publishing.

Again I returned to my WordPress blog, the plugin page, and refreshed it.

I got the message that I had successfully configured Wordbook.

I created the new post to test the work of the plugin.

In a moment I saw the text of my post on the wall of my Facebook account.
How to transfer website from Netfirms to 2by2host

Transferring your site from NetFirms to 2by2host

There are two ways of doing that: 1). complicated and 2). very complicated for an average user. Decide which one to use based on your experience. The steps are the following:

Easy and fast transfer from NetFirms to 2by2host

  • First of all you need to enable SSH. To do that log in to your account and go to “Hosting > Settings > SSH > Enable”.
  • Login to SSH and create a tar archive of the domain you're going to transfer
  • Copy created tar archive to a publicly visible folder on your website:

    cp archive.tar.gz /public_html/

  • Once copied you need to download the archive and copy it from the old server to us

    wget -c http://domain.name.com/archive.tar.gz

  • Now it's time to create a dump of a database connected to your website (if any)

    /usr/local/nf/bin/mysqldump -e –force –quick -h mysqlhost -u Username -pPassword DatabseName > BackupFile.sql

    or

    mysql -u Username -pPassword DatabseName > BackupFile.sql

  • Once we are on our server we need to unpack the downloaded file into the home directory of a domain

    tar -xvf archive.tar.gz

  • After we unpacked the archive we need to make sure the permissions of the transferred websites are correct

    chown username:usergroup * -R

  • If there were any databases, create them using cpanel
  • Change DB(s) login and site path settings in website's files (if any)
  • Import downloaded databases into created ones on our server

    mysql -u Username -pPassword DatabseName < BackupFile.sql

OpenX cannot currently run on your machine

We offer reliable OpenX hosting and we'll make sure you never have any issues like this.

Sorry, but OpenX cannot currently run on your machine

When installing OpenX you might run into this issue due to having PHP4 as default version for your account

Detected problems:

  1. The built in PHP function “parse_ini_file” is in the “disable_functions” list in your “php.ini” file.
  2. PHP version 5.1.4, or greater, was not detected.

To resolve this issue.

  1. Log in to your cPanel
  2. Click on the “PHP Configuration” icon
  3. Under “The “.php” file extension will be processed by” select PHP 5
  4. The error should be gone now and your files will be automatically processed by PHP 5

Taking the screenshot

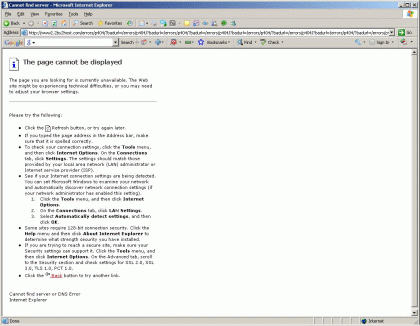
When there's something wrong with your site (you're getting some errors like “Forbidden or not found” or any other ones) we recommend you to take a screenshot of the browser window and send it by email to our support team at support-team@2by2host.com

How to take a screenshot:

  1. In the browser (Opera/InternetExplorer/Mozilla Firefox) window, where you're seeing the problem, press the
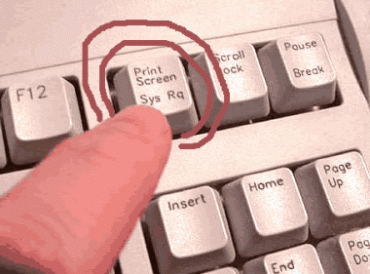
    PrintScreen or Prt Scr (above the Insert key, right from the F12 key).
Picture of keyboard

  1. Open a new Word document.
  2. Press the Ctrl+V combination (or Меню «EditPaste»). The screenshot will be inserted in to the document.
  3. Save the Word document and send it to us as an attachment.

Sample of the screenshot

The actual size of the screenshot has been reduced.

How to publish your ads using OpenX system

Step 1. LOG IN to your OpenX software and CLICK on the “Inventory” tab:

Step 2. CLICK on the “Add new advertiser” tab on the “Advertises” page:

Step 3. FILL OUT all neccessary fields and CLICK on “Save Changes”:

Step 4. CLICK on the “Add new campagin” link near the added advertiser, on the “Advertises” page:

Step 5. FILL OUT all neccessary fields and CLICK on “Save Changes”:

Step 6. CLICK on the “Add new banner” link near the added campaign, on the “Campaigns” page:

Step 7. FILL OUT all neccessary fields, choose a banner for uploading and CLICK on “Save Changes”:

Step 8. CLICK on the “Websites” link in the left column:

Step 9. CLICK on the “Add new website” link on the “Websites” page:

Step 10. FILL OUT all neccessary fields and CLICK on “Save Changes”:

Step 11. CLICK on the “Add new zone” link near the added website, on the “Websites” page:

Step 12. FILL OUT all neccessary fields, SET dimensions of the zone (it should be the same as the dimensions of your banner(s)) and CLICK on “Save Changes”:

Step 13. CLICK on the “Linked Banners” link near the added zone, on the “Zones” page:

Step 14. CHOOSE an advertiser and a campaign to add them to the created zone:

Step 15. The campaign is added. CLICK on the “Invocation code” tab to get the HTML code of the zone, to use it on your website:

Step 16. SELECT the type of the code (Javascript Tag is recommended) and COPY it to your website's template into the place, where you'd like your banner to be displayed:

How to enable debugging in phpBB3

Activating debug in phpBB

Does your forum not work properly or you don't know what happened to it after you installed some phpBB mods or/and themes? Activate debugging for your phpBB forum. To enable it and see the errors you should edit the config.php file located in the root folder of your forum's installation and un-comment (means remove two forward slashes) the following line:

// @define('DEBUG', true);
// @define('DEBUG_EXTRA, true);

Unable to see the errors output after you enabled phpBB debug?

It is possible that the feature that displays PHP errors might have been disabled by your hosting provider. In that case you can enable error repoting directly in your .htaccess file

Disabled functions in PHP and solutions to make them work

We know PHP very well and this websites is powered by that it (or Hypertext Preprocessor as many experienced developers call it). We can create almost any PHP application, as well as modify or fix any existing ones.

Server security configuration issues

In some cases hosting providers will disable PHP functions in order to protect their servers and the websites hosted on those servers. In some cases it is a legitimate practice but in others it can lead to the “overprotection” which will make it impossible to run common features on your sites.

We listed most of the functions that can be disabled. If you click on the name of the function below you will see some ways of how to make things work. Most of the solutions are similar to each other. Keep checking back for the updated list.

List of PHP functions that can be disabled

How to configure Outlook to work with your email account

by Alex Benko, 2by2host

There are 3 pieces of information needed when configuring Outlook to work with POP and SMTP email.

  1. Your POP and SMTP mail server address
  2. Your user name and password
  3. Make sure your ISP (Internet Service Provider) doesn't block port 25

Follow these instructions to configure Outlook

  1. Open up Outlook
  2. Click Tools – Account Settings
  3. Click New… this will launch the configuration wizard, choose Microsoft Exchange, POP3, IMAP, or HTTP option and click Next
  4. At the bottom of the screen check the “Manually configure server settings or additional server types” box and click Next
  5. Make sure “Internet E-mail” is checked and click Next
  6. Fill in your information; name and email. For account type make sure POP3 is selected
  7. Use mail.your_domain_name.com and the same for the Outgoing mail server (SMTP)
  8. Type in your username (should be full email address ex: user@domain_name.com) and your password
  9. Click Next and Finish

Note: If your Internet Service Provider blocks outgoing port 25 do the following:

  1. Click the More Settings… button from your account configuration page
  2. Click the Advanced tab and change the Outgoing server (SMTP) value to 587
  3. Click OK

If you are our cPanel hosting – GoEasy plan customer, then it's possible to download the email settings directly from your hosting cPanel.

How to optimize performance of your site

How to optimize performance of your site and why it is important?

How quickly your site loads is directly relevant to how long a user will stay on your site. Slow sites are frustrating and can be also putting a large load on the server.

Follow the steps below to go over all important checks to determine where the problem is.

  1. Check your error logs. You will see what pages have problems or are no longer available. Fixing those errors will decrease the load on the server and will prevent search engine from indexing your errors. All these will make your site works faster
  2. Check your database. If your site is using a database look for very large tables, tables with errors and error log tables. It's amazing how much junk you can find that is slowing down your site
  3. Check the size of your files. This especially applies to graphics files. Their size should be as little as possible w/o the quality loss or at least noticeable quality loss.
  4. Check what external scrips your pages are loading. Some of your pages might have code in them that calls and loads information from external resources. If the external resource is slow or down then it will affect the loading of your page. See if this information can be cached. This would drastically improve the page load.
  5. Check how you send your emails. Why put an email load on your site when you can use another external service and in some cases even a free one like Gmail or Yahoo. This will also cut down on your bandwidth usage
  6. You can always ask us to do a report for your site for $75 that will show the areas that need improvement. We can also make the necessary changes for you for an additional estimate.